How to Use Multiple GitHub Accounts

Search for a command to run...
No comments yet. Be the first to comment.
What is a Peer and How Do They Connect? So when we talk about conference apps like Zoom, Google Meet, or WhatsApp group calls, we're essentially talking about multiple devices connecting to each other in real-time. Each device is called a peer. A pee...
Most developers have a mental model of how a database works: You insert a row, the database finds the right spot on the hard drive (usually using a B-Tree), and slots it in perfectly. It’s neat, organized, and reliable. But what happens when you need...

Today, I want to talk about something really cool: how Apache Lucene stores and retrieves data so efficiently. We're not diving into Elasticsearch (it's built on top of Apache Lucene) but into the magic that makes Lucene so powerful for full-text se...

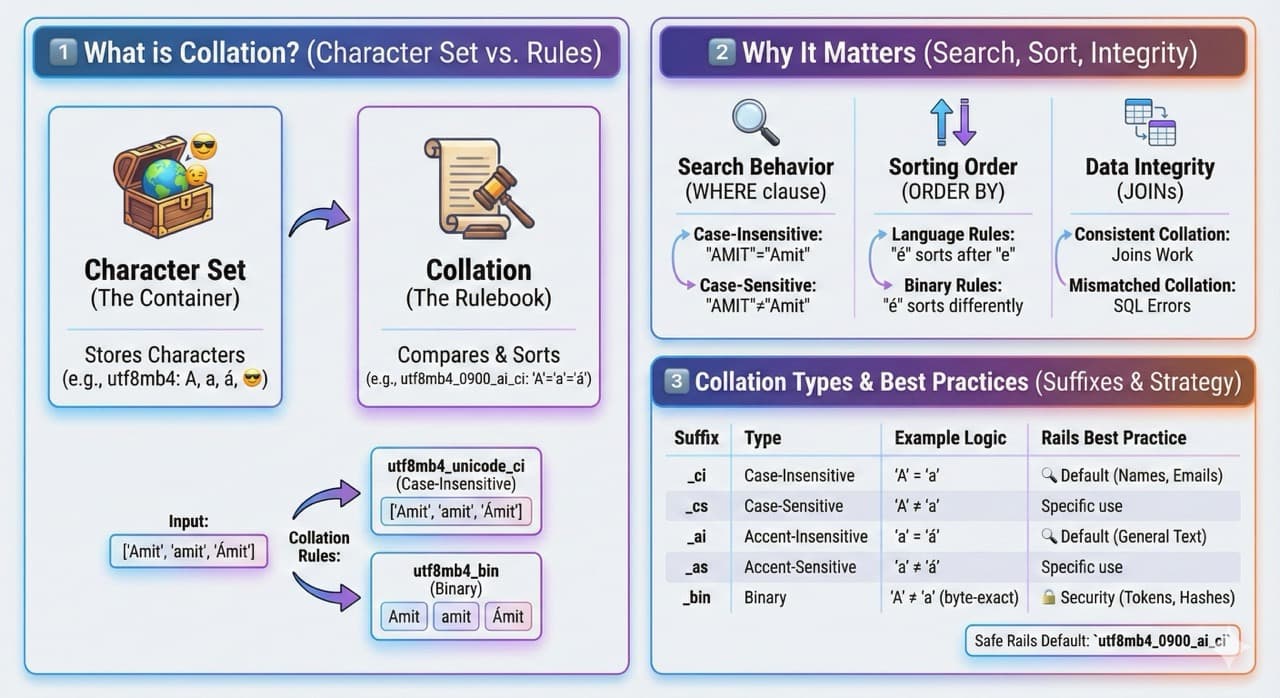
You've likely seen collation settings in your schema.rb or database.yml many times, but do you know exactly how they impact your application? In a standard Rails application, you might see this in a migration: add_column :users, :name, :string, colla...
ClearYourDoubt
5 posts
If you have multiple GitHub accounts, it can be a challenge to manage them on the same computer. Fortunately, with a few configuration changes, you can easily use multiple GitHub accounts.
Here are the steps to set up multiple GitHub accounts:
Work on both personal projects and company-owned repositories
Contribute to open-source projects with a personal account while working at a company
Maintain multiple projects under different GitHub accounts
Want to keep work and personal contributions separate
Before you begin, ensure you have:
Two or more GitHub accounts already created
Access to your terminal/command line
Basic familiarity with Git and SSH
macOS, Linux, or WSL on Windows (Git and SSH pre-installed)
Git already installed and configured on your machine
First, you need to generate SSH keys for each GitHub account you want to use. You can use the following command to generate an SSH key for your "Account 1" GitHub account:
ssh-keygen -t rsa -b 4096 -C "your-email@example.com"
Be sure to replace "your-email@example.com" with the email address associated with your "Account 1" GitHub account. When prompted, save the SSH key to the default location (~/.ssh/id_rsa).
Repeat this process for each GitHub account you want to use, using a unique name for each SSH key (e.g., id_rsa_account1 for "Account 1", id_rsa_account2 for "Account 2", etc.).
Next, you need to add the SSH keys to each GitHub account. Log in to your "Account 1" GitHub account and go to the "Settings" page. Click on the "SSH and GPG keys" tab, then click the "New SSH key" button. Paste the contents of the id_rsa_account1.pub file (located in ~/.ssh/) into the "Key" field and give the key a descriptive name. Click "Add SSH key" to save the key.
Repeat this process for each GitHub account you want to use, using the appropriate SSH key for each account.
Next, you need to create a configuration file for SSH to specify the different hosts and SSH keys to use for each GitHub account. Use the following command to create a new configuration file:
nano ~/.ssh/config
In the configuration file, add the following lines for each GitHub account:
# Account 1
Host github.com-account1
  HostName github.com
  User git
  IdentityFile ~/.ssh/id_rsa_account1

# Account 2
Host github.com-account2
  HostName github.com
  User git
  IdentityFile ~/.ssh/id_rsa_account2
Replace "account1" and "account2" with unique names for each GitHub account.
Next, clone the repositories using Git. For each GitHub account:
Open a terminal and navigate to the directory where you want to clone the repository.
Use the following command to clone:
git clone git@github.com-account1:username/repository.git
Replace username with the username of your GitHub account, and repository with the name of the repository.
Important: I made a mistake initially by not using the Git hostname correctly. I was using the incorrect command:
git clone git@github.com:username/repository.gitBy omitting the correct hostname, I experienced "access denied" errors when attempting to push or pull.
To avoid this, make sure to use the correct format:
git clone git@github.com-account1:username/repository.git
Repeat this process for each GitHub account and repository.
If you have existing code on your local machine:
cd /path/to/repository
git remote -v
git remote set-url origin git@github.com-account1:username/repository.git
git remote -v
By following these steps, you can associate your existing local code with the appropriate
For security reasons, your SSH keys should have specific file permissions. Once you've generated your SSH keys, ensure they have the correct permissions:
# Set permissions for SSH directory
chmod 700 ~/.ssh

# Set permissions for private keys
chmod 600 ~/.ssh/id_rsa_account1
chmod 600 ~/.ssh/id_rsa_account2

# Set permissions for public keys
chmod 644 ~/.ssh/id_rsa_account1.pub
chmod 644 ~/.ssh/id_rsa_account2.pub
These permissions ensure:
700 for ~/.ssh: Only you can read, write, and execute the directory
600 for private keys: Only you can read and write your private keys
644 for public keys: Only you can write, but everyone can read
When working with multiple accounts, you may want to configure your Git user identity per repository to ensure commits are attributed to the correct account:
# Navigate to your repository
cd /path/to/repository

# Set user name for this repository
git config user.name "Your Name"

# Set user email for this repository
git config user.email "your-email@example.com"

# Verify the configuration
git config --list
If you want to set this globally for all repositories, use the --global flag:
git config --global user.name "Your Name"
git config --global user.email "your-email@example.com"
If you notice that your commits are still being attributed to your old/work account instead of the correct one, you need to fix the repository configuration:
# Navigate to your repository
cd /path/to/repository

# Set the correct user email for this repository
git config user.email "your_email@example.com"

# Verify the configuration was updated
git config user.email
Make sure to:
Use the correct email address for your intended account
Run this command inside the repository directory (not globally)
Verify the output shows your intended email address
Test with a new commit to ensure it's attributed correctly
If commits were already made with the wrong account, you'll need to rewrite the commit history to fix the author information. This is beyond the scope of this guide, but tools like git filter-repo or git filter-branch can help.8. Verify SSH Connection
Before cloning or pushing to a repository, verify that your SSH connection is working correctly:
# Test connection to GitHub with account1
ssh -T git@github.com-account1

# Test connection to GitHub with account2
ssh -T git@github.com-account2
You should see a response like:
Hi username! You've successfully authenticated, but GitHub does not provide shell access.
If you encounter any issues, use the verbose flag to debug:
ssh -vT git@github.com-account1
Problem: You get "Permission denied (publickey)" error when trying to push or pull.
Solution:
Verify your SSH key is added to the GitHub account
Check that the SSH key file has correct permissions (chmod 600)
Ensure you're using the correct hostname (e.g., git@github.com-account1)
Test the connection: ssh -T git@github.com-account1
Problem: Git is using the wrong account for push/pull operations.
Solution:
Verify the remote URL with git remote -v
Ensure the hostname matches your SSH config (e.g., github.com-account1 not github.com)
Check git config: git config --local user.email
Update remote if needed: git remote set-url origin git@github.com-account1:username/repo.git
Problem: "Could not open a connection to your authentication agent" or SSH key not found.
Solution:
Start SSH agent: eval "$(ssh-agent -s)"
Add your SSH key: ssh-add ~/.ssh/id_rsa_account1
Verify key is added: ssh-add -l
Problem: SSH agent tries wrong key first, causing "too many authentication failures".
Solution: Modify your ~/.ssh/config to specify which key to use first:
Host github.com-account1
  HostName github.com
  User git
  IdentityFile ~/.ssh/id_rsa_account1
  IdentitiesOnly yes

Host github.com-account2
  HostName github.com
  User git
  IdentityFile ~/.ssh/id_rsa_account2
  IdentitiesOnly yes
The IdentitiesOnly yes option ensures only the specified key is used.
Use Descriptive Hostnames: Make your SSH config hostnames descriptive (e.g., github.com-work, github.com-personal)
Keep Keys Secure: Never share your private SSH keys and consider using a passphrase for added security
Regularly Rotate Keys: Periodically generate new SSH keys for security
Use SSH Agent: Add your keys to SSH agent for seamless authentication:
 ssh-add ~/.ssh/id_rsa_account1
 ssh-add ~/.ssh/id_rsa_account2
Document Your Setup: Keep a record of which key belongs to which account
Test Before Critical Operations: Always test SSH connection before important push/pull operations
Monitor SSH Activity: Regularly check active SSH keys on your GitHub accounts (Settings > SSH and GPG keys)
Managing multiple GitHub accounts on the same machine is a common workflow for developers who maintain both personal and work projects. By following these steps, you can:
Generate and manage multiple SSH keys securely
Configure SSH to use different keys for different accounts
Associate repositories with the correct GitHub accounts
Debug and troubleshoot common authentication issues
The key to success is ensuring that:
SSH keys have correct permissions
SSH config maps hostnames to the right keys
Git remotes use the correct custom hostnames
Each repository is configured with the right user identity
With this setup, you can seamlessly switch between multiple GitHub accounts without authentication headaches. Remember to keep your SSH keys secure and regularly review your active keys on GitHub's settings page.remote origin URL for each GitHub account.